Google+ Adventures in Paleo-land: How To
Showing posts with label How To. Show all posts

Friday, February 27, 2015

12 Tips for Better Sleep

It's that Lent time of year again. Though I’m not very religious myself, I usually give something up for lent. This year, I’m instituting a No Screens in Bed rule. This isn't to say I’m not going to have a few nights of staying up too late watching cute puppy videos on youtube, but if I do, I won’t be in bed when I do it. And having to get out of my warm comfy bed to watch a youtube video is going to be a real deterrent for me.

But it works! The first time I did this on a weeknight, I managed to turn my typical 5-6 hours of sleep into 8 hours and 15 minutes of sleep.

In today’s society, many of us have problems with “turning off.” With all of the advances in technology that allows us immediate access to practically all of the information and entertainment you could want, we tend to have a constant stream of stimulation. We’re over stressing our brains.

Sleep is critical. Studies have shown that lack of sleep can have significant impact on your health. Some medical conditions related to sleep include: diabetes, obesity, cardiovascular disease, hypertension, immune function, and the common cold.
“people who averaged less than seven hours of sleep a night were about three times more likely to develop cold symptoms than study volunteers who got eight or more hours of sleep when exposed to the cold-causing rhinovirus.” - Cohen S, et al. Sleep Habits and Susceptibility to the Common Cold, Arch of Intern Med. 2009 Jan 12; 169 (1):62-67.

Not only is your physical health impacted, but also your mental health. Lack of sleep can increase stress, anxiety, sadness/depression, and mental exhaustion. In turn, your emotional and mental state can impact your ability to fall asleep and sleep soundly. (http://healthysleep.med.harvard.edu/need-sleep/whats-in-it-for-you)

Over the years, my dad and I have discussed sleep issues extensively. Here’s a compiled list of things you can do to improve your sleep and decrease the time required to fall asleep.
  1. Use your bed only for sleep or sexy time (not that I do that, Dad!). This means no reading in bed, watching TV in bed, checking your phone in bed, eating in bed, etc. Your bed should be solely dedicated to sleep, otherwise you condition yourself to expect mental stimulation while in bed.
  2. Make your bedroom your sleep sanctuary. Some options include: installing blackout curtains and soundproofing windows (or using an eye mask and ear plugs if those don’t drive you crazy), painting the walls a soothing color, getting newer/softer sheets, or even buying a more comfortable mattress. If you’re a neat freak and maybe have some obsessive-compulsive tendencies, make sure you always keep your room clean, so that you’re not stressing about a mess. Make your bed every day. My grandmother always told my father that he’d sleep better in a crisply made bed, and he told me the same thing growing up. Maybe it was the power of suggestion, but it makes a difference. I get a sense of joy from the neatness of freshly turned-down sheets and curling up with smoothed sheets around me.
  3. Don’t eat a large meal within two hours of bed. Eating a small snack that’s low in fat, like an apple, will be digested relatively quickly - usually within an hour. If you eat a large meal, your body will still be digesting when you’re trying to fall asleep. Also, if you’re prone to heartburn or gastrointestinal reflux, lying down while food is in your stomach makes reflux more likely. (http://www.theglobeandmail.com/life/health-and-fitness/ask-a-health-expert/is-it-true-i-shouldnt-eat-one-hour-before-bed/article550198/)
  4. Create and follow a standard sleep schedule. Sorry, to break it to all you partiers out there, but this means no staying up into the wee hours of the night on the weekends and sleeping away half of the day. If you wake up at 6 a.m. during the week, you should wake up at 6 a.m. on the weekends, too. Not only is this useful for getting enough sleep on a daily basis, but also it’s beneficial if you’re prone to headaches - changing your sleep schedule can cause a migraine. This may be particularly bad for those of you in your 20s who haven’t quite reached the age where you’ve realized your body can’t keep up with your wild partying all the time. Another important fact to note is that you can’t “make up” all that lost sleep. Sure, if you slept badly last night, you could go to bed a bit earlier tonight to “make up” for a couple hours of lost sleep, but if you lose 2 hours a night during the work week, you can’t make up those 10 hours on the weekend. You’ll never get that sleep back.
  5. Don’t take naps (unless you’re sick). This goes along with number 4. Taking a nap late in the afternoon can really mess with your sleep at night, because you most likely won’t be tired when it’s time for you to go to bed.
  6. Establish an evening routine. What I mean is every night as you get ready for bed, you follow the same routine. 30 minutes before bed, I change into my PJs, wash my face (+ maybe do a face mask), brush my teeth, turn on my bedside lamp and turn off the overhead light, and then do my physical therapy stretches.
  7. Avoid alcohol, caffeine, nicotine, etc. I know a lot of people have said that some alcohol at night helps them fall asleep, but alcohol can prevent you from sleeping soundly. I know for me that I can pass out pretty quickly, but I tend to be fully away by 5 or 6 am the next morning, even if I only went to sleep a few hours before.
  8. Don’t exercise right before bed. Yes, you should be exercising regularly, but doing it right before bed perks stimulates the body to secrete cortisol (stress hormone) and can keep you from falling asleep.
  9. Don’t stay in bed if you can’t fall asleep. If you find yourself laying in bed and feeling wide awake and frustrated about not falling asleep, do 10 minutes of meditation, deep-breathing, etc. If that doesn’t help, get out of bed and read a book for 20 minutes, or go drink some warm milk. What it comes down to is that you shouldn’t just lay in bed thinking “Ugh. I’m still awake. Why can’t I fall asleep? It’s 11:23 p.m. I have to be up at 6:00 a.m. If I fall asleep right now, I’ll only be getting 6 hours and 37 minutes of sleep. I’m going to be so tired tomorrow.”
  10. Don’t stress about getting a set number of hours of sleep each night. Everyone is different and you need to find the length of sleep that leaves you feeling energized, not exhausted, the next day. One of the suggestions for a Paleo/Primal lifestyle is switching to life without an alarm clock; this is a good way to figure out how much sleep you need is to let yourself sleep until you wake up. You will have to go to bed earlier in order to make sure you wake up for work on time. Keep a sleep diary by tracking how long you sleep and how you feel periodically the next day: how do you feel when you There are a few sleep tracking apps that you can use to figure out how long you sleep each night. I use the Sleep Cycle App for Apple.
  11. Steer clear of blue light at night. Blue light, similar to the type of light on your phone, tablet or computer, is associated with sunlight or daytime hours. Studies have shown that being exposed to short-wave light at night suppressed melatonin by ~50% (http://www.pnas.org/content/112/4/1232.full.pdf+html). So looking at your electronic device at night can actually make it more difficult for you to fall asleep and reach deep REM sleep. Reddish light on the other hand does not significantly affect melatonin levels. Programs such as f.lux for your PC or Twilight for your Android can be installed to mimic natural light. The program uses your location to determine the times of sunrise and sunset. When the sun sets, the screen becomes more red; when the sun rises, the reddish tint fades away to the normal screen coloring. Unfortunately, Apple devices aren’t as easy to change the screen coloring. Instead, you can try using orange-tinted safety goggles. Or you can just read a book by candle/firelight. Whatever works for you.
  12. Make sleep a priority. Too often we stay awake just a bit longer to finish reading a book or watching a movie or TV episode. Recognize the importance of your sleep and stop making excuses. Good luck and sweet dreams...

Thursday, September 26, 2013

How To: Roast Bell Peppers

Exciting news everyone! I now have a facebook page. Go check it out, and like me!


How To: Roast Bell Peppers
1. Preheat oven to 400 F.
2. Line a baking sheet with tin foil and place the peppers on their side.

3. Bake for 20 minutes, then use tongs to flip the peppers.

4. Bake for another 20 minutes. The peppers should look charred and should be very soft. Roast for a few more minutes if they're not ready.

5. Once the peppers are out of the oven, you need to let them steam for a little bit longer. You can use the tin foil that you baked on, and wrap up the edges to make an enclosure for the peppers. Alternatively, you can place the peppers on a cutting board and place an upside-down bowl over the peppers. Let them sit for 10 minutes.

6. Now, make a single cut along the pepper and roll the pepper open, so you have one long strip. Pull the stem to remove some of the seeds, then use your hand or a paper towel to remove any remaining seeds.

7. Flip over the pepper and peel off the charred skin.

8. Slice the pepper. Serve, or store in an sealed container under olive oil.


Friday, September 20, 2013

Whole 30 - Day 33

Well, I lasted through the week. And I'm done with my Whole 33 (i.e. 33 days). I celebrated the end with drinks at a charity bar. I'm sure you're wondering what a charity bar is. Well, it's a bar that donates its proceeds to a different charity each month. The bar picks four charities for one month. For each drink that your buy, you get a token, which you get to put in the barrel that corresponds to the charity of your choice. I think that's a valid reason to start drinking again after a month's hiatus, right?The charity I supported was the Leukemia and Lymphoma Society (for good reason if you remember my family's recent diagnosis of hairy cell leukemia). I managed to convince a few other patrons to donate to LLS. It's amazing what you can do by meeting new people.

Speaking of meeting new people... it's amusing what people think they can get away with at bars. For instance, there were a couple of guys whom I was talking to who had French accents, yet tried to convince me that they were Russian. Why? I have no clue. Is it more bad-ass to be Russian? But I do know that I'm not that bad at identifying accents. I'm pretty sure I can distinguish French vs. Russian. And what I didn't tell them is that I use to take some French classes, so I can still identify a few words. Really people? Americans aren't that dense.

How-To Cut a Mango
1. Use a peeler to remove the skin of the mango


2. Slice the mango length-wise 360 degrees. Push the knife into the mango until you hit the pit. You'll know it when you do.

3. Then insert the knife into one of the cuts that your made - as far in as you can. Turn the knife to the side, and pull sideways, against the pit.

Thursday, September 5, 2013

Whole 30 - Day 18

For ages when I made hard-boiled eggs, I struggled with removing the shell. I'd try like crazy to remove the shell without pulling the egg with it. I looked online and found lots of different options. I tried one method that had you add vinegar to the water; another where you boiled the water, then removed the pot from the stove, put the eggs in the pot, and put the lid on the pot, but it seemed like every time, the egg would stick to the shell and no matter how slowly or carefully I went, my resulting egg looked like a hot mess. So I decided to try a different way, and this is what worked wonderfully for me.

How to cook the perfect hard-boiled egg
1. Bring pot of water to a boil, ensure the water is high enough that it will cover the eggs. Add a shake of salt to the water and stir.
2. Add your eggs to the pot and boil for 3 minutes.
3. Put cover on the pot and remove from heat. Let the eggs sit in the hot water for 10 minutes.
4. Transfer eggs to an ice bath until they cool completely. Now you're ready to peel and enjoy.

Look at how smooth that sucker is...

As promised, here are some of the photos of the plated Korean Beef Short Ribs I made on Monday. You can also check out the original post (which I have since updated) for these photos. Enjoy the deliciousness!


Thursday, August 29, 2013

Whole 30 - Day 11

I'm really cutting this close with getting a post out today, aren't I? Well, my reasoning is simple. I had crew practice after work, where I took out a single and gouged some more skin off of the knuckles of my right hand. Then I rushed home to shower and grab a bite to eat before meeting up with my out-of-town friend J. I figured nobody at the bar would appreciate me showing up sweaty, and I didn't really want to sit in my sweat-drenched clothes (Boy, was it warm today, so I didn't exactly have time to sit down and type up a post, but I'm doing it now. So there.

Despite being up and out so late on a weekday, I'm still pretty energetic, probably because I was so excited to see J again. We had interned together up in Pennsylvania five years ago, then had both lived in Texas for a while, before he returned to the North. Work brought him back to the grand state of Texas, so I abandoned my 9 pm bed time and caught up with him and his wildly ridiculous stories. He is the BEST storyteller. I always have a blast with him!

Anyways, I'm going to share with you a way of steaming asparagus in the microwave... without any dishware. Say what? Keep reading.

Prosciutto-Wrapped Asparagus

1 bunch asparagus
1/4 cup water
1 tsp lemon juice
salt and pepper
1 packet of Proscuitto

1. Grab 3 papertowels. Use the 1/4 cup of water and lemon juice to wet the entire papertowel. Lay flat.
2. Rinse the asparagus and trim off the bottom inch to inch and a half of the stem.
3. Spread the asparagus on the papertowels, sprinkle with salt and peppa, and roll that sucker up. Proceed carefully so you don't tear the sheets apart.
4. Place in the microwave and nuke it for 4 minutes. And your asparagus is ready.
5. Wrap up 5-6 stems in each piece of Prosciutto and serve... with some chicken and wilted spinach and baby kale.

Tuesday, December 4, 2012

Colors, Crafts, and Steak


So I apparently don’t know how to run without injuring myself. I participated in a color run (5k) over the weekend and managed to roll my ankle once again. It was only 3 miles, yet somehow, I fit in another sprain – at the green color station. Of course, I kept running and finished the race, but my ice pack and ACE bandage were necessities once I got home. Disregarding the return of my ankle pain, the race was a blast. Something about being rainbow-colored is immensely satisfying. I highly recommend it. Just try not to injure yourself.

This ankle injury is kind of baffling to me. How do I keep injuring myself? If I didn’t know better, I’d say that I’m klutzy. But I don’t often trip over myself or fall over or knock things down. As a child, I did 6 years of ballet lessons, so by the time I switched over to soccer, my coach was impressed that I didn’t fall over like most of the other girls on my team. I had and still have good balance. Yet make me run on even slightly uneven ground and whoops, there goes my ankle. As I mentioned before, my running career is over.

This past weekend has been a Christmasy weekend. I hit up Ikea twice for some Swedish Christmas decorations, lights, and candles to set up around my apartment. I also spent some time in the crafts section of Wal-Mart. Here is the result of my Sunday afternoon crafting session with KAOS and How the Grinch Stole Christmas playing the background:

Monday and Tuesday of this work week has been spent primarily in training. They have provided fruits, muffins, pastries, and sugared fruit juices for breakfast and sandwiches for lunch. One thing that I noticed while I wasn’t eating breakfast was that more of the fruit was gone in comparison to the amount of grain-based sweets. Also, during lunch, I saw that 4 of the 16 people in our training ate the insides of their sandwiches but didn’t eat the bread/wrap. It made me happy to see that other people are also restricting their grain intake (though I recognize that they may be doing so as part of a Southbeach-esque diet).

Anyways, time for a How-To…

How-To: Cook Steak in the Oven 

Need:
Oven
Cast-iron skillet/griddle
~1-lb rib-eye steak, grass-fed, at room temperature
Olive oil
Salt
Pepper

Set the oven to broil. Let heat for ~20 minutes. Place a cast iron pan over medium-high heat on the stove until hot (heat your griddle in the oven).

While things are heating up, pat dry your grass-fed rib eye steak. Then brush with olive oil. In a small bowl, mix together salt and pepper. Sprinkle evenly over the steak on both sides.

Now that your pan/griddle is hot (pull the griddle out of the oven and place over stove), place your steak on the hot surface. Flip over after 30 seconds. After both sides have been seared for 30 seconds, flip back over onto the original side, and transfer pan/griddle into the oven. Cook for 2 minutes for medium-rare, or 4 minutes for medium. Once cooked to your liking, remove from the oven and transfer to plate, covering with tinfoil. Let the steak rest for 5 minutes. Slice against the grain and serve immediately.

You may get some smoke in your kitchen, so I recommend turning on overhead fans and opening a window to prevent your smoke detector from going off like mine did.

If you’re like me, eat ¼ of your steak for breakfast with one scrambled egg, and wilted spinach.

Thursday, August 23, 2012

How to: Balsamic Reduction

This is probably the easiest "how-to" ever. Reductions in general are a relatively easy concept to grasp.

How To: Balsamic Reduction
This works well on medium-quality balsamic vinegar that you intend to drizzle. Use a ratio of 4:1 for how much balsamic vinegar you start with compared to how much you want. Put the balsamic vinegar into a pan over medium-high heat. Bring to a boil and cook for 2-4 minutes or until the vinegar is a little bit thinner than you want your final product to be (the balsamic vinegar will continue cooking in the pan). Remove the pan from heat. You're done! Be careful not to use higher heat settings. If you do that, your balsamic reduction can solidify into a sticky mess. Trust me. It happened to me. As soon as it cooled slightly it was basically solid, which is quite unpleasant.

Balsamic vinegar (a.k.a. Aceto Balsamico Tradizionale) is originally from Italy (no surprise there). It is an aged reduction made from Trebbiano grapes, but is not a wine vinegar (like red wine vinegar) because the grape juice from which it's made is not fermented. Check out the labels on the bottles at the store before you buy. There are imitators masquerading as high quality products that have added coloring and thickeners, such as guar gum or cornflour. Just be wary.

Some ideas for using balsamic vinegar reductions:
  • Grilled or boiled meats
  • Fresh or grilled veggies
  • Pineapple
  • Salad dressing
  • Strawberries
  • Parmesan-Reggiano cheese (if you eat dairy)

Monday, August 6, 2012

Eye Dominance

Did you know that you have a dominant eye? Surprise, you do! And no, it's not necessarily the same as your dominant hand. I'm right-handed and left-eyed. The term is ocular dominance, and refers to the brain's preference of visual input from one eye over the other.

How To: Test Eye Dominance
1) Hold your hands at eye level in front of you, thumbs and forefingers touching. Your hands should be vertical, as if your hands are pushed against a wall.
2) Move your hands closer together, so that the triangle formed by your thumbs and fingers has gotten to be about the size of a quarter.
3) With both eyes open, focus on an object in the distance through the triangle.
4) Now close your left eye. Can you still see the object you focused on? Congrats, you're right-eyed. If you can't see the object, you're left-eyed. Just to make sure. Reopen your left eye and close your right eye. What do you see? If the object is no longer in your field of vision, you have confirmation that you are in fact right-eyed. If you can still see it, congratulations, you are one of the rare people who do not have a dominant eye.

Roughly 2/3 of the population is right-eye dominant. A small percentage of people show no eye-dominance, however that still leaves us with about 1/3 of people being left-eye dominant.

What this means: if you shoot bows and arrows or guns, you might need to change what side you shoot from. For archery, you'll hold the bow with your right hand and pull back on the string with your left. It allows you to aim better. For shooting guns, you may want to adjust your stance so that your right foot is is front and your left arm is straight, using your right hand to steady the gun.

An interesting fact about people who have left-eye dominance is that there seems to be a correlation between people who suffer from with migraines (particularly auras) and left-eye dominance. (1)

And for something fun (thanks to BF for introducing me to this):
"I shake my ears back and forth"
1) Aygül R, Dane S, Ulvi H., Handedness, eyedness, and crossed hand-eye dominance in male and female patients with migraine with and without aura: a pilot study. <http://www.ncbi.nlm.nih.gov/pubmed/16158700>

Friday, June 29, 2012

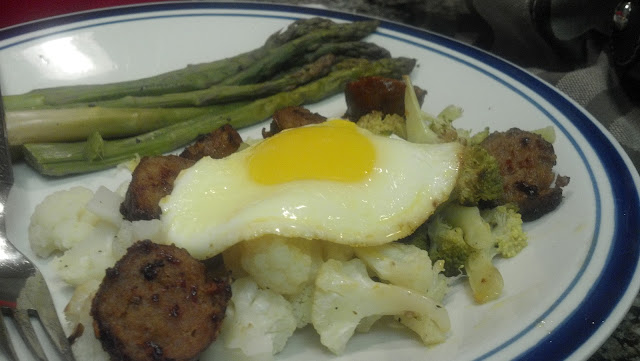
Chorizo, Eggs, and Roasted Veggies


Wednesday's post-boot camp dinner: Chorizo, Sunny-side up egg, roasted broccoli, roasted cauliflower, and roasted asparagus.

How To: Roast Veggies
This is an incredibly simple way to roast up some veggies.
  1. Preheat oven to 400F.
  2. Rinse and dry vegetable of choice. Cut into bite-size pieces if applicable (broccoli, cauliflower, carrots)
  3. Tear yourself a piece of tin foil large enough to wrap up your veggies and place your vegetable of choice on the foil.
  4. Season with salt and pepper.
  5. Add 2 tsp of water.
  6. Wrap up in tin foil.
  7. Place tin foil packet in the oven and cook for ~30 minutes (some veggies, such as beets and carrots, require more time). You can also cook the vegetables longer if you prefer your veggies to be extra-tender.
Optional: You can also add a teaspoon of lemon/lime/orange juice if you want to give your veggies some more flavor. Personally I like adding some lemon juice to my asparagus.


Saturday, April 14, 2012

How To: Chop Onions


Onions make me teary-eyed, so I try to get the entire chopping experience over as quickly as I can. However, I'm a bit of a perfectionist, so I like the resulting onion pieces to be as uniform in size as possible. What to do? I went to a knife skills class a little over a year ago where they showed me this technique.

1. After removing the outer skin, cut the top and bottom off of your onion.
2. Place one of the flat ends down, and cut the onion in half.
3. With the new flat side down, start cutting 1/4" from one flat edge to the other. You basically want to cut from the outside of the onion to the center of the onion, so your cuts won't be straight up and down. Notice that my first slice shown here is almost horizontal.
4. Work your way radially across the onion. See the sketch below and the following photos for visuals...

I'm an onion. Cut me like this...      .


5. Now you want to cut perpendicular to the cuts you just made.
Notice how I'm holding the onion, with my thumb on one side and my pinkie on the other. This helps maintain the shape of the onion while you cut.
And here's your final product.


Friday, March 30, 2012

No Alarm

I mentioned on Monday that I slept napped for roughly 30 minutes on Sunday night. I lasted all day without falling asleep! (Although my team's 1 o'clock meeting tested my willpower.) I think I survived Monday because I took an Excedrin at 7 a.m. to deal with the headache that I woke up with at 3:45 a.m. For those who don't know, Excedrin Extra Strength contains 65 mg of caffeine... caffeine that has been absent from my body for the past month. My theory is that those measly 65 mg was enough to power my decaffeinated body through the entire work day as well as through a Dave and Busters happy hour, dinner, bowling, and video-gaming. Around 8 p.m., I started to feel a bit lethargic, so I left. I admit that I didn't do P90X on Monday... Stop those judging stares right now! I doubled up on Wednesday and Thursday to make up for the workouts I missed!

By the time I finally got home, I was on auto-pilot. I dumped my dirty Tupperware from lunch into the sink to deal with later and went about my nightly get-ready-for-bed routine. I crawled into bed and realized that it was now the time to decide when to wake up. Knowing how badly my body needed sleep, I said "Screw it. I'll wake up when I wake up." So for the first week night since starting Paleo, I actually followed the sleeping advice of waking up when your body is rested. I fell asleep around 9:15 p.m. after reading 2 of the introductory pages of The Paleo Diet Cookbook, and woke up a glorious 9 hours and 30 minutes later at 6:45 a.m.

When I told Z that I hadn't set an alarm, his response was "Did you not care when you'd wake up?" Well, I'm a very responsible person who plans a lot, so of course I cared about when I would wake up, whether I would have time to fit in P90X before work, and when I would make it in to work. But for once, I chose sleep over everything else. I chose my health over work and working out. Plus, I wake up at 5 a.m. most days, so it was highly unlikely that I'd sleep in until 10 and leave my bosses wondering what happened to me all morning. And I'm sure one of my co-workers would have called me to make sure I was alive. At least I hope they would care.

Waking up without an alarm is pretty awesome though. You don't get jolted awake like those falling dreams we all have (I always wake up before I hit the ground. I don't know if that's good or not). Plus, you're more likely to get the amount of sleep that your bodies needs as opposed to the length of time that you're allowing yourself to have. I urge you to try it at least once. Suggestions for the first time that you try this:

  1. Determine when you want to wake up. I ideally like to wake up by 5 a.m. to fit in a workout, cook breakfast, and get to work by 7
  2. Set a backup alarm, but plan to wake up long before then. I want to wake up by 5. Because I have to get to work by 8 (core hours), I can sleep until 7 a.m. at the latest. My backup alarm time is therefore 7 a.m. Notice I have 2 hours of time in between my wake up time and my backup alarm.
  3. Set a sleep alarm. This is the time that you need to go to bed to get X hours of sleep (fill in the blank here - do 8 or more). I aim for 8 hours of sleep every night, which means that I have to go to bed my 9 p.m. I like to have a warning alarm, so I'll set my alarm for 8:30. This let's me have a 30-minute window to wrap everything up and get ready for bed. 
  4. Bright and early. If you must use an alarm consider one that slowly brightens the room. Or, use the actual sunrise (that is, if you wake up at a reasonable hour at which the sun is actually rising unlike the 5 a.m. I do when it's still dark outside).

Ideally I'd like to do this every day, but in order to do so, I need to find more hours in the day. Any suggestions for slowly down time?

Thursday, March 29, 2012

How To: Roast Garlic

Roasted Garlic
1 bulb garlic
1-2 tbls olive oil (depends on how large your bulb is)


Preheat the oven to 400°F. Peel away the outer layers of the garlic bulb skin, leaving the skins of the individual cloves intact.
Using a knife, cut off 1/4 to a 1/2 inch of the top of cloves, exposing the individual cloves of garlic.
Place the garlic head on aluminum foil. Drizzle olive oil over each clove; use your fingers to make sure it's well coated. Wrap in the foil and bake at 400°F for 35 minutes. The resulting cloves should feel soft when pressed. Allow the garlic to cool. Use your fingers to squeeze the roasted cloves out of their skins. Use in pasta sauce or eat alone. LR likes to eat them on water crackers with a slice of pepperoni.

I do not recommend eating this when you have an upcoming date, interview, or presentation, etc. You could have really strong breath after this, but on the bright side you won't have to worry about vampires...

Monday, March 26, 2012

How To: Almond Flour

Today is going to be a rough day. And I mean extraordinarily rough. I got about 30 minutes of sleep (this is an optimistic guesstimate) somewhere around the 3:15-3:45 a.m. time frame. I just couldn't fall asleep and I was woke up at 4:00 a.m. to drive CL to the airport. Yet another friend is moving out of the state, though he's taking it one step further and leaving the country for "America's Top Hat", more commonly known as Canada. (I love Canada and Canadians, and I apologize if I offend anyone with the top hat joke.) Anyways, onto the real topic for today...

Almond Flour

Almond flour (meal) is seriously just ground almonds. In general almond flour uses almonds that have been blanched, meaning the skin has been removed. Almond meal can use blanched or whole almonds. It resembles corn meal more so than wheat flour. Because of the natural oils in almonds, it's not great for foods such as bread that require real dough. Kneading almond flour dough just doesn't work.

Anyways, there are two methods of making almond flour: food processor or blender. I tried both and you can see the comparison below.

Top left: 1 cup of blanched and sliced almonds
Top right: Into the food processor
Bottom left: Results of the food processor
Bottom right: Into the blender
The results:

The blender definitely ground the almonds more finely and did it faster than the food processor could. I think this was because there was just so much space available for the sliced almonds to spins around in the processor without hitting the blades. I recommend using the blender for this and use a half cup or less of almonds at a time (depending on your blender size). Also, be careful not to blend too much or you'll make almond butter. Which is yummy, but maybe not quite what you were going for.

Saturday, March 3, 2012

Meat with salad

It's been a tad on the hectic side lately, so I'm really thankful for all of the leftovers that I have from this past week. Looking back now at these photos, I feel like I was a little lazy this past week with my meals. My office buddy joked at all of my meals were meat with salad, but in different arrangements. Truer words have not been spoken. I do need to work on my inventiveness, but give me some time to get into the swing of things. Below are some of the photos from this past week's meals.

Tuesday lettuce wrap
Wednesday's salad
Beef Stew for lunch on Monday. Tuesday's lunch was a lettuce wrap. I put pork chops, grape tomatoes, and mushrooms inside a large leaf of iceberg lettuce, folded over the edges and dug in. This was intended to be a chicken wrap, but I managed to grab the tupperware with pork chops instead of chicken. Oops. Fortunately it all worked out. My salad on Wednesday was very similar to Tuesday's wrap/sandwich, but differed in the type of lettuce and type of meat (I managed to grab the chicken this time). Oh, and I added broccoli and topped it off with a little balsamic vinegar and extra virgin olive oil (EVOO). Thursday lunch out was a turkey burger (minus the bun) and a fruit cup.

Friday morning breakfast
Every morning except for Friday I ate frittata with chipotle and guacamole. It's a little monotonous, but it's yummy. I'm still trying to figure out different breakfast ideas. Most of the breakfasts that I would have eaten pre-Paleo were grain- or dairy-based. There was cereal with milk, oatmeal, muffins, bagels, toast, eggs, yogurt, smoothies made with yogurt, hash-browns, etc. This is everything that is paleo from that list: eggs.


My dinner tonight consisted of a pork chop over wilted spinach with garlic, roasted broccoli, and a side salad. Notice the leafy greens... I'm working on my calcium. A hint to everyone who doesn't like broccoli or vegetables in general. Roasted tastes way better and is really easy. I did two types of roasted broccoli: garlic and red pepper, and basil and rosemary. I prefer the garlic and red pepper ones, but I've listed the ingredients that I used below.
Roasted Broccoli - Garlic and Red Pepper
1/2 pound broccoli, rinsed and trimmed
1 tlbs olive oil
3/4 tsp garlic salt
1/4 tsp freshly ground black pepper
1/3 tsp crushed red pepper

Roasted Broccoli - Basil and Rosemary
1/2 pound broccoli, rinsed and trimmed
1 tlbs olive oil
1/3 tsp rosemary
1/2 tsp basil
1/2 tsp salt
1/4 tsp freshly ground black pepper

Preheat oven to 400 F.
Cut broccoli into small bite-sized pieces, and put into a large mixing bowl. Add all ingredients (for the particular type of roasted broccoli you're making) and toss. Spread seasoned broccoli onto a pan and cook for 13 minutes or until the broccoli is tender. Eat and enjoy.

How To: Wilted Spinach - possibly the easiest thing you could do
1 pound spinach, washed and thoroughly dried
2 cloves garlic, sliced
1 tbls olive oil

Heat olive oil in skillet over medium-high heat. Add the garlic, cooking until the garlic is soft but not colored. Reduce heat to medium-low and add spinach. Cook until spinach turns dark green and reduces significantly in size, stirring often. Done. That wasn't hard, was it?