Google+ Adventures in Paleo-land: Roasted
Showing posts with label Roasted. Show all posts

Monday, February 10, 2014

W30D15

I woke up this morning and decided that I wanted to fast today. At the time of this post, I'll have gone without food for 27 hours. I don't know all of the reasons why, but I always feel GREAT when I fast. I have no stomach issues, no headaches, and consistent energy levels. I even worked out tonight. I did 45 minutes on my rowing machine and then spent 15 minutes doing yoga stretches and working on inversions (a.k.a. head stands).

I really need to research fasting some more, because as great as I feel now, not eating for extended periods of time is just not going to work for me. So I need to figure out what it is that I'm eating that is causing me to have lingering stomach issues. Thoughts anyone?

Roast Chicken

4 lb free-range chicken
2 Tbls olive oil
3 tsp salt
3 tsp pepper
1 lemon
4 cloves garlic, smashed
2 sweet potatoes, chopped into 2" pieces
10 carrots, roughly chopped
1 yellow onion, thickly sliced
1 bunch celery, roughly chopped

1. Preheat the oven or roaster to 350 F.
2. Rinse the inside and outside of the chicken. Pat dry and then coat with olive oil.
3. Rub 2 tsp salt and 2 tsp pepper into the skin of the bird. Make cuts in the skin near the wings of the bird and use the holes to rub salt and pepper under the skin as well.
4. Rub the remaining salt and pepper on the inside of the bird.
5. Cut the lemon in half and squeeze the lemon on the inside of the bird. Then place the lemon halves and the smashed garlic cloves into the chicken.
6. Spread the sweet potatoes, onion, carrots, and celery chunks across the bottom of the pan. Use a rack to place the chicken above the vegetables.
7. Cook for 1 hour (roughly 15 minutes per pound of chicken). Halfway through, baste the chicken and drain off the liquid in the bottom of the pan; this will make sure the bottom of the chicken gets crispy as well.

ECD7: 45 minutes rowing machine, 15 minutes yoga

Tuesday, October 1, 2013

Pumpkin-Acorn Squash Soup

Yesterday I decided to try out intermittent fasting (IF). IF basically just means going through periods of time of not eating (drinking water and low-calorie drinks such as tea) and eating

It's one of those things of which I've been skeptical. I mean, breakfast is the most important meal of the day, right? Well, that may still be true, but there is an argument that IF can aid weight loss by increasing fat oxidation, decreasing fasting insulin levels, and increasing insulin sensitivity. Head to Mark's Daily Apple for more information.

Despite a few hunger that hit around 9:30 a.m. and 12:30 p.m., I felt great. I drank water and tea. I wasn't hungry and I wasn't struggling with cravings for food throughout the day. My stomach did start rumbling pretty loudly after my Krav Maga class yesterday evening, so I ate some food after practice, even though I still didn't feel terribly hungry. I ended up feeling like I ate too much at dinner though, so that'll be something to work on in the future. I lasted a full 24 hours without food. I've mentioned before that I'm an emotional eater. If I'm stressed, bored, tired, etc., I tend to eat. Plus I seem to also use grabbing a snack as a short break. Yesterday I didn't have that option, but I survived without much effort.

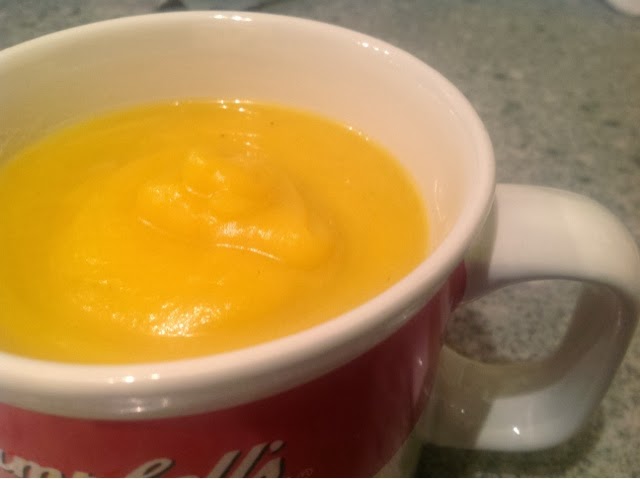
Compare that to today. I started out the day with a mug of Pumpkin-Acorn Squash Soup (see recipe below). Within 2 hours, I wanted to eat something else. I know that I didn't have my usual protein for breakfast, so that could be part of the culprit. But I find it interesting that on my IF day, I wasn't hungry and didn't have to put any effort into restraining my snacking, but today, when I started off the day with food, I wanted more food, more frequently. I guess that's your body heading into starvation mode.

Pumpkin-Acorn Squash Soup (10 servings, 1 cup per serving)

1 pie/sugar pumpkin
1 acorn squash
2 Tbls coconut oil
1 Tbls olive oil
1 onion, finely chopped
3 Tbls thyme, fresh, leaves
4 cups chicken broth (1 Mason jar)
1/8 tsp cinnamon
1/4 tsp ginger
1/4 tsp nutmeg
1/3 cup coconut milk
1 1/2 tsp apple cider vinegar
pepper, to taste

1. Preheat oven to 400 F. Line a baking sheet with tinfoil.
2. Slice the pumpkin and acorn squash in half. Scoop out the seeds and set aside seeds for a different use.


3. Brush the flesh of the pumpkin and acorn squash with coconut oil. Place the halves, cut side down on the baking sheet. Place in the oven for 50-60 minutes, until the skin is easily punctured with a fork. Remove from the oven and let cool for 15 minutes so you don't burn yourself. During this baking/waiting time, you can do something else, or chop onions, or whatever you want. After cooling, peel the skin off of the flesh or use a spoon to scoop out the flesh.


4. Once the pumpkin and acorn squash are cooling, heat olive oil in a large pot over medium heat. Add in the onion and thyme, cooking for 5 minutes or until soft.
5. Add the pumpkin and acorn squash flesh to the pot along with the chicken broth. Bring to a boil for 10 minutes, then reduce heat and simmer for 15 minutes. Remove from heat and let cool for 10 minutes.


6. Transfer the mixture in small batches to a blender. Process each batch for a minute or until the mixture is smooth and creamy. You can also use an immersion blender, but it may not end up as creamy.

7. Once the entire pot has been blended, stir in the remaining ingredients. Reheat on the stove and serve immediately. Top with sage if you feel like it.


Here's how much soup I got out of this recipe.

Here's a nutrition label based on the results from inputting my recipe to PaleoTrack.com. These values assume a serving size of 1 cup, with roughly 10 cups of soup altogether.


Friday, June 21, 2013

Easy Roast Pork Loin

I know, I know... It's been a week. I have no excuse. Just my own laziness and tiredness. On Tuesday I got into bed at 7 p.m. and fell asleep by 7:30. Sadly my 9 o'clock "It's time to go to sleep alarm" woke me up. No, the irony of that has not been missed by me. Anyways, it was a wildly busy weekend, and I was worn out by the time my wildly busy week started. Staying at work until 8:30 p.m. on Monday didn't help. On the bright side, I made it to yoga last night and got to chill out a bit.

Anyways... Onward to the food!

Because I've been simultaneously busy and lazy, I wanted something easy to make. And what better than a simple pork roast?

Easy Roast Pork Loin
3 lb pork loin roast, tied
2 Tbls Dijon mustard
2 Tbls apple cider vinegar
1 Tbls olive oil

1. Preheat oven to 375 F. Heat 1 Tbls olive oil on the stove over medium heat.
2. Season pork with salt and pepper.
3. Brown the pork on all sides (~2 minutes each). Remove the pork from the pan.
4. Whisk together the Dijon mustard, apple cider vinegar, and pork drippings. Brush over the pork, coating thoroughly.
5. If you weren't already using a oven-safe pan, transfer to a baking dish. Then put the whole thing into the oven. Cook for roughly 20 minutes per pound or until internal temperature is 145 F. I cooked mine for about an hour.
6. Remove from oven, transfer to plate, and cover with tinfoil. Let rest for 10 minutes. Go ahead, put your feet up to relax. Then enjoy your dinner.

For a side, you can toss a sweet potato in the oven 20 minutes into the cooking cycle, allowing 40 minutes to cook your sweet potato. Then slice up and serve with the pork. It makes a sweet and tangy combination.

Tuesday, April 9, 2013

Chemo - Part 3 - Day 2

Today was pretty similar to yesterday's visit to the doctor, except that we got an actual room and I knitted instead of blogging. Yes folks, I knit. I find it relaxing. We were only at the doctor for two and a half hours today. I guess things go faster once you get the procedure down. Things are going well so far - a bit more tired, but overall still staying active (we took the dogs for two walks today - the dogs are out cold right now because they're so worn out). Fingers crossed that things continue to go well.

Now to food... While I was at Whole Foods the other day I picked up a chicken to cook and make chicken broth out of (recipe to come). Because my co-worker BA was so unhappy with me for using a whole chicken to make my last chicken broth instead of using just the bones, I decided to follow his advice and roast the chicken first. Here's what I did for the roast chicken:

Roast Chicken

1 5-lb chicken
Inside the chicken
5 sprigs fresh thyme
1 lemon, cut in half
1 head garlic (yes, the whole head), with the outer layers peeled and cut in half
Outside the chicken
3 sprigs fresh thyme
2 Tbls olive oil
1 onion, sliced (~3/8" thickness)
6 carrots, cut into large chunks
2 bags of Brussels sprouts, rinsed and trimmed
1 bulb fennel
Both inside and outside
Salt
Pepper

Preheat oven to 425 F.

Remove the giblets/whatever they're called from the inside of the chicken. Rinse both the inside and outside of the chicken, and pat dry. Liberally sprinkle salt and pepper inside the chicken. Stuff the chicken with the thyme, lemon, and garlic. Use kitchen string/twine to tie the legs together, or use something like the metal prongs that I found in one of my parents' kitchen drawers to skewer the poor thing closed. Rub the outside of the chicken with olive oil so that the chicken is thoroughly coated, then rub with salt and pepper. Don't be stingy.

Spread the carrots, Brussels sprouts, onion, fennel, and thyme in the roasting pan. Toss with olive oil, salt, and pepper. Make a hole in the center of the veggies and position the chicken in the opening. Place the roasting pan in the oven. Cook for 1 1/2 hours or until the inside of the chicken reaches 170 F with a meat thermometer.


Remove the chicken from the roasting pan and transfer to a platter, covering with tinfoil. Let rest for 20 minutes.


Then cut and serve. It's so yummy!


I also want to point out that this is the first time that I've ever cooked a whole chicken. Or whole anything for that matter. The last time I had to deal with a whole raw bird was Thanksgiving three and a half years ago. My parents had come out to Texas with the dogs to celebrate with me. My mom took charge of the bird and called me over to help out at the sink. I tried. I really tried, but I couldn't do it. I couldn't reach inside to pull out the giblets and whatnot. I actually shrank away... I was too chicken (yes, that horrible pun was intended).

However, thanks to Paleo and my need to eat meat, I've learned to handle raw meat, in particular raw poultry (I'm still working on fish). So when I roasted this chicken, I passed with flying colors, though I washed my hands like 15 times over the course of prepping the chicken. So I'm a bit crazy about germs right now... or technically always... it just means that I'm a safe chef, right? You're welcome, kitchen counters and bottle of olive oil for keeping you clean.

Tuesday, April 2, 2013

Roasted Garlic Pasta Sauce

Yesterday I tracked my food intake on PaleoTrack, a free Paleo food journal. The cool thing about this food journal is that it let's you know if you're staying "Strict Paleo" or if you ate legumes, sugar, dairy, or grains. It also tracks your nutrient intake, including amino acids, vitamins, and minerals. Additionally, the journal calculates your omega 6:omega 3 and sodium:potassium ratios, and signals if you're within the appropriate Paleo ranges. This is a screenshot of the results of my food intake yesterday: 


As you can see, I got "Congratulations! You are: Strict Paleo!" The beauty of Paleo is that though I only ate 1153 calories worth of food, I felt full after every meal, even after one hour of kickboxing. And when I got hungry at work, I snacked on green pepper slices and a pear while.

Anyways, it's recipe time...

Roasted Garlic Pasta Sauce
1 large onion, chopped
3 tablespoons extra-virgin olive oil
1 tablespoon minced garlic
1/4 cup tomato paste
1 1/2 teaspoons salt
1 teaspoon balsamic vinegar
1/2 teaspoon hot sauce
1/4 teaspoon red pepper flakes
1/4 teaspoon Italian seasoning
1/4 teaspoon dried basil leaves
2 (28-ounce) cans crushed tomatoes, with their juices
2 whole heads roasted garlic, cloves removed from peels

Saute the onion in the olive oil in a large saucepan over medium-high heat until soft (about 5 minutes). Add the minced garlic and cook, stirring, for 1 minute. Add the tomato paste, salt, balsamic vinegar, hot sauce, red pepper flakes, Italian seasoning, and basil, and cook for 1 minute. Add the crushed tomatoes and their juices. Stir and bring to a boil. Reduce the heat to a  simmer and cook for 20 minutes, stirring occasionally. Add the roasted garlic and stir to combine. Continue to simmer for 30 minutes longer. Then toss onto your zucchini pasta or spaghetti squash.

Thursday, February 28, 2013

More Celtic Things

To maintain my love of Celtic things, I'm going to a Dropkick Murphy's concert tonight. Technically, by the time you read this, I should already be at the concert. I went to a Flogging Molly concert a couple weekends ago and it was amazing! I'm sure tonight's show will be the same. I don't know if there's many Paleo-friendly Celtic traditional dishes, besides Paleo Shepherd's Pie... I'll look into it.

I also got a kick out of the sign-off used by one of my teammates from crew (rowing). They closed their email with:

"Slow the  Slide"

For those of you who aren't rowers and don't understand this, let me explain. First off, your feet are strapped into foot stretchers and don't move. Your seat is on wheels on tracks (a.k.a. slides), so your butt slides backward and forward in the boat. There are two main parts of rowing: the drive and the recovery. The drive starts when you're as compressed as you can be. In other words, your legs are bent, you're back is leaning slightly forward, and your arms are extended in front of you. This position is called the catch. You then explode with your legs (straighten your legs quickly), lean back slightly and pull the oar into your chest (bend your arms). You're now at the finish. At this point, you would tap your oars out of the water by lowering your hands, and feather your oar by rotating your wrists back so that your palms are facing forward-ish (feathered: the blade is parallel to the water. this cuts down on wind resistance and is easier to avoid hitting your blade against the water). You're starting your recovery now. You extend your arms, lean forward, and bend your knees, up until you end up back at the catch. During this recovery process, you have to make sure that you don't compress your legs too quickly. Doing so can "check," or slow down, the boat. Slowing down this compression, so it's controlled is called the "slowing the slide," because you're slowing otherwise frantic rush up the tracks.

Anyways, what do you do with leftover Curry Burgers and Roasted Curry Cauliflower? You make a frittata with it.
Curried Frittata
1 lb curry burger ground beef
1 1/2 cup roasted curry cauliflower
6 eggs
Preheat your oven to 375 F. Grease the bottom of a round pan with coconut oil or olive oil. Transfer your cooked and seasoned meat and cauliflower to the pan, and stir to mix. In a separate bowl, whisk together 6 eggs with a sprinkle of salt and pepper. Pour over your beef and cauliflower in the pan, making sure it's evenly spread. Move your baking pan to the preheated oven, and cook for 25 minutes. The frittata is done once the egg is solid. Let sit for 15 minutes. Slice, reheat if necessary, and enjoy.

Tuesday, February 26, 2013

One-Year Anniversary

On this day last year I made my first ever blog post. Last Wednesday was the one-year celebration of starting the Paleo diet. I went to a happy hour, but not exactly in celebration of Paleo, not to mention that drinking probably isn't the best way to celebrate Paleo. Anyways, yay for one year! I'm excited about it.

In honor of this day, I decided to try to mix it up a bit and go for a different genre of food. So I made myself an Curry Burger

Curry Burger

1/2 lb ground beef
1 tsp ground coriander seeds
1/2 tsp cumin seeds
1 tsp ground black pepper
1/2 tsp ginger
1/4 tsp cardamom
1/4 tsp cloves
1/4 tsp cinnamon

Mix up the spices and then use your hands to mash it into the burger. Heat over medium-low heat on a skillet. Flip after about 3 minutes. Enjoy with a side of Roasted Curry Cauliflower.

Roasted Curry Cauliflower
1 head of cauliflower, chopped
1 1/2 Tbls EVOO
1 tsp curry
1/2 tsp tumeric
1/2 tsp sea salt

Preheat oven to 400F. Place your ingredients into a gallon-sized Ziploc bag. Seal and shake until evenly distributed. Spread over a tin foil-lined baking sheet, and place into the oven for 35 minutes, stirring after 20 minutes.

Wednesday, January 16, 2013

Bacon and Veggie Frittata

The last morning that I was in Atlanta, my parents made a frittata for me. Aww, aren't they just the sweetest? I don't know exactly how they prepped everything, so I'll just tell you what I would do.

Bacon and Veggie Frittata
1 cup kale, ripped to pieces
1/4 cup red bell pepper, chopped
1/4 cup orange bell pepper, chopped
1/4 cup yellow bell pepper, chopped
1/2 onion, chopped
1 cup roasted cauliflower (precooked)
5 strips bacon, chopped
8 eggs, whisked

Preheat oven to 350 F. Place your uncooked and chopped bacon into a large pan over medium-high heat. Cook for 5 minutes or until the pieces are crispy. Remove bacon pieces.

Add the onions and cook until starting to turn translucent. Toss in your kale, stirring to coat with the glorious bacon grease. (If you're not using grass-fed bacon, you could remove the bacon from the pan and pour out the bacon fat. Instead use coconut or olive oil for cooking the veggies.) Cook for a couple minutes before throwing in the rest of your veggies. Remove from heat and stir the bacon bits back in.

Transfer the veggies and bacon to a greased 13"x9" baking pan. Pour the eggs over the veggies and bacon, making sure that the ingredients are evenly distributed. Bake for 25 minutes.


Friday, January 11, 2013

Bacon Brussels Sprouts

What Brussels sprouts really look like...


Looks kind of funny, doesn't it? If you have the time, go ahead and buy the stalk. However, if you're not on vacation like me and generally short on time, just buy a bag of the buds, because it definitely takes some extra time to pull the buds off of the stalk and then pull off the outer leaves. Also, rinse thoroughly, because when my mom and I were working our way through the stalk, there were some tiny black bugs crawling around (shhhh, I didn't point them out to my mom at the time because I didn't want her to freak out).

I've mentioned cooking Brussels sprouts with bacon before, and I really need to emphasize this fact. It's delicious! And in case you need step-by-step instructions to realize this for yourself...


Bacon Brussels Sprouts
1 stalk Brussels sprouts (or 1-2 lbs of buds)
5 slices bacon
2 Tbls EVOO
2 tsp garlic salt (or use a combination of garlic powder and salt)
1 1/2 tsp fresh-ground black pepper

Preheat oven to 400 F.

Rip the buds off of the stalk and pull off the top two outer leaves (I always do this, but it's not necessary). Cut the stem off and then cut the bud in half. Place all of the halved buds into a gallon-sized Ziploc bag and add the EVOO, garlic salt, and pepper (other seasonings can be used as well). Seal the bag and shake well.

Using a sharp knife, chop up the slices of bacon. Cook in a pan over medium heat until crispy. Scoop out the bacon and transfer to the bag with Brussels sprouts. Remove the pan from the stove and let cool for a couple minutes. Then pour the bacon fat over the Brussels sprouts, seal the bag, and toss to coat. If you don't let the bacon fat cool, you could end up melting the plastic bag, which is bad. I said the Brussels sprouts were good with bacon, not plastic. Even bacon can't make plastic taste good.

Cover a baking sheet with tin foil. It works best if you use a baking sheet with edges. Spread out the Brussels sprouts and place in the oven. Cook for 20 minutes before flipping the sprouts over. Cook for another 15-20 minutes, then remove and serve.

Monday, November 26, 2012

Whole 30 - Thanksgiving

So my family really likes Crock-pots. We're from the Midwest... it's a thing. We love us some Crock-pots.

And here's my Thanksgiving plate: Turkey, ham, mashed cauliflower, and roasted Brussels sprouts with bacon. And I drank chamomile tea almost constantly for the last few days.

Shortly after eating, my cold took over and I fell asleep on the couch, with my head on my father's shoulder while watching a football game. He fell asleep, too. And his snoring woke me up. Thanksgiving Day was not a good one for my cold. But tea made my throat feel better.

On Friday, my family celebrates Christmas (a.k.a. Thankmas). My uncle's family (kids, grandchildren, and great grandchildren) all gather for Thanksgiving, and it makes more sense for them to celebrate Christmas at the same time so that they don't have to travel to the same place twice within a month. Starting Thursday night, Thanksgiving decorations start getting switched out for Christmas ones. And on Friday, we go for Scandinavian foods, like pickled herring and Swedish meatballs. Though I didn't eat the meatballs, because they come in a cream-based sauce. It was killing me, trust me. I love Swedish meatballs. They're delicious!

Friday, June 29, 2012

Chorizo, Eggs, and Roasted Veggies


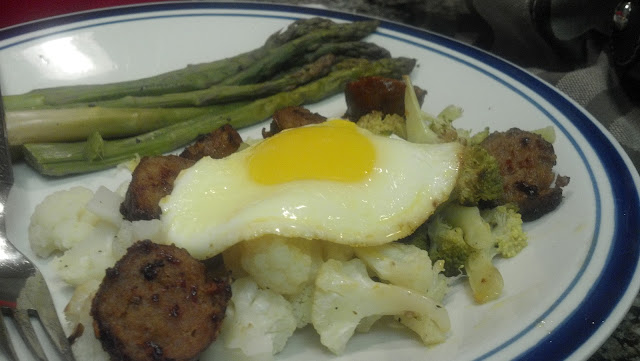
Wednesday's post-boot camp dinner: Chorizo, Sunny-side up egg, roasted broccoli, roasted cauliflower, and roasted asparagus.

How To: Roast Veggies
This is an incredibly simple way to roast up some veggies.
  1. Preheat oven to 400F.
  2. Rinse and dry vegetable of choice. Cut into bite-size pieces if applicable (broccoli, cauliflower, carrots)
  3. Tear yourself a piece of tin foil large enough to wrap up your veggies and place your vegetable of choice on the foil.
  4. Season with salt and pepper.
  5. Add 2 tsp of water.
  6. Wrap up in tin foil.
  7. Place tin foil packet in the oven and cook for ~30 minutes (some veggies, such as beets and carrots, require more time). You can also cook the vegetables longer if you prefer your veggies to be extra-tender.
Optional: You can also add a teaspoon of lemon/lime/orange juice if you want to give your veggies some more flavor. Personally I like adding some lemon juice to my asparagus.


Wednesday, June 27, 2012

Lemon Herb Chicken


Lemon Herb Chicken Marinade
zest of half of a lemon
1 tsp garlic salt
1/2 tsp oregano
1 tsp basil
1 tsp parsley
2 cloves garlic, minced
1/4 cup olive oil

Place 1 pound of thawed chicken breast into a gallon size Ziploc bag. Mix the ingredients together and pour into the bag with the chicken. Seal the bag and shake to coat evenly. Open the bag slightly and squeeze as much air out as possible without spilling the marinade. Let sit in refrigerator for 2 hours or more. Cook chicken as you normally would. I served mine with roasted cauliflower, and a summer salad with strawberries and blueberries).

Thursday, June 7, 2012

Roasted Purple Cauliflower


I was meandering through the grocery store the other evening (oh, who am I kidding, I went with a thorough list of what I needed), when I found purple cauliflower. I've read blogs and seen photos of purple cauliflower, but this was the first time that I've actually seen it in person. Anyways, I decided to buy some. Once I got home, I roasted it in the oven; and OMG, it was amazing. If you haven't tried it, you should! I was snacking on it right when I took it out of the oven and it was so delicious that my mind combined wow and amazing to WOW-MAZ-ING! I know I'm kind of raving, but it was soooo good!

Roasted Purple Cauliflower
1 head purple cauliflower
2 Tbls Extra-virgin Olive Oil (EVOO)
1/2 tsp garlic salt
1/2 tsp pepper

Preheat oven to 350 F. Rinse the cauliflower and remove the leaves and stem. Chop the cauliflower into bite-size pieces (it's white on the inside). Put into gallon-size ziploc bag. Add EVOO, garlic salt, and pepper. Spread onto baking sheet and bake for 35 minutes.

I did the same thing with broccoli but added red pepper flakes. Again, delicious! And a little spicy.